 Numbering light plot objects
|
Command |
Path |
Shortcut |
|
Spotlight Numbering |
Spotlight > Reports |
Ctrl+Shift+Alt+N (Windows) Cmd+Shift+Option+N (Mac) |
The Spotlight Numbering command numbers lighting devices, accessories, and other light plot objects such as focus points, hoists, cable runs—or any drawing object with a record attached. You can number the objects by unit number or by other parameters that automatically increment.
There are a few more ways to number lighting devices and accessories. You can automatically number lighting devices as they are inserted (see Inserting lighting devices) or number lighting devices by hanging position (see Numbering lighting devices by hanging position). To copy the unit number from lighting devices to their accessories, see Copying the unit number to all accessories.
The Spotlight Numbering command has two basic workflows. Automatic numbering is great for standard layouts where you can marquee-select the objects to number. If the selection involves more clicking, or drawing a marquee would be too complex, then manual numbering is recommended. A benefit of manual numbering is that you can change the numbering options midway through the process.
Automatic or manual numbering: Select objects in the drawing, and then set the parameters and number the objects.
Context menu commands can select lighting devices by certain criteria; see Selecting lighting devices by criteria. The Custom Selection command or Select Similar tool also can be used.
Manual numbering: With nothing pre-selected, specify the type of object to number and set the parameters, and then number the objects.
Multi-cell lighting devices have special numbering behavior. Preference settings determine which fields support individual cell values, and this affects the numbering; see Spotlight preferences: Lighting Devices: Parameters pane.
Automatic numbering: Fields that do not support individual cell values are numbered once for the entire device, and numbering continues with the next lighting device. For fields that do support cell values, the cells are numbered sequentially based on their index numbers before proceeding to the next device.
Manual numbering: Fields that support individual cell values can be numbered individually, but fields that do not support individual cells can only be numbered once per device.
To number light plot objects:
Do one of the following:
For automatic numbering, select the objects to be numbered.
For manual numbering, either select the objects or skip this step.
Select the command.
The Spotlight Numbering dialog box opens.
Click to show/hide the parameters.Click to show/hide the parameters.
|
Parameter |
Description |
|
Saved Settings Options |
See Using saved sets to save and apply saved settings |
|
Object |
Lists the plug-in objects and objects with a record in the file. Select the type of object to number; if numbering an object with a record, select the type of record from the list on the right. Only one type of object can be numbered at a time. |
|
Field List |
Lists record fields that contain text or numbers. Click to place a check mark in the Use column of one or more fields to number. Then select each checked row to specify its Numbering Options. |
|
Numbering Options |
|
|
Start |
Enter the starting number or letter |
|
Prefix/Suffix |
Specify any numbering prefix or suffix |
|
Apply the same numbering to all units |
Applies the same value (numeric or alphabetical) to all numbered objects. No increment is applied, so the Increment by value is not available. |
|
Automatically increment the numbering |
Automatically increments the value, which applies to numeric or alphabetical labels. For example, a Start of 2, Increment by value of 2, and Suffix of A numbers the objects as follows: 2A, 4A, 6A, and so on. |
|
Increment by |
Sets the increment interval |
|
Increment by DMX footprint (lighting devices only) |
Instead of setting a constant increment value, the increment is based on the DMX footprint (control channel values) assigned to the lighting device. When the Universe is full, the next universe is selected automatically. |
|
Limit |
Sets the stopping point for numbering objects, opening the Spotlight Numbering dialog box when the limit is reached. For example, you may wish to avoid going over 400 control channels per universe; set a limit so that the Spotlight Numbering dialog box opens after the set number of lighting devices have been numbered. Change the needed information, and then continue numbering. The Address field cannot go over 512. |
|
Number of Units per Increment |
Sets the number of objects that receive the same set value before incrementing to the next value. For example, set the Circuit Number field to an Increment by value of 1 and the Number of units per increment to 5. A selection of ten lighting devices will number the first five with a Circuit Number of 1 and the next five with a Circuit Number of 2. |
|
Accessory Numbering (lighting devices only) |
Select how lighting accessories are numbered. Alternatively, use a context menu command to copy the lighting device unit number to all accessories; see Copying the unit number to all accessories. None: The accessory field is not numbered. Same as Lighting Device: The accessory field uses the same number as the lighting device (or the same number as the associated cell in a multi-cell device). Add Prefix and Suffix: The accessory field uses the same number as the lighting device (or the same number as the associated cell in a multi-cell device), but with the specified Prefix and Suffix added. Next Number: The accessory field uses the next number in the sequence set by the Numbering Options. |
|
Prefix/Suffix |
When Add Prefix and Suffix is the Accessory Numbering method, specify the Prefix and Suffix |
|
Numbering Direction |
These parameters apply to preselected objects only |
|
Primary Direction |
The numbering direction is relative to the page; select the desired direction. Select Manual to number the objects by clicking, instead of automatically by selection. |
|
Single click manual numbering for multi-cell |
For multi-cell lighting devices, automatically increments the numbering of each cell with a single click on the lighting device |
|
Secondary Direction |
Available choices depend on the selection in Primary Direction; when numbering manually, this option is not available |
|
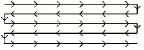
Use zigzag pattern |
Uses the Primary Direction and Secondary Direction as the starting point for numbering, and then numbers the objects in a zigzag pattern
|
|
Tolerance |
Specifies a tolerance distance for adjacent numbered objects to be considered "lined up" with each other for consecutive numbering |
|
Multi-Cell Numbering (lighting devices only) |
Select the format for numbering multi-cell lighting devices. The Unit Number field must be selected for numbering. |
Specify the kind of object to be numbered, the record field(s) to be numbered, and the numbering parameters.
The Numbering Direction parameters are only available for pre-selected objects. If nothing was pre-selected, you'll have to number objects manually by clicking.
Click OK.
Do one of the following:
If numbering objects manually, click on the objects one by one. The data bar displays the information to be assigned to the next clicked object, so you can change it if needed; see Using the Data bar. To stop numbering, click the green check mark on the Tool bar, or double-click in an empty area of the drawing.
Shift-click to number an object without incrementing the value, so the next object can be numbered exactly the same way as the previous object.
If objects were pre-selected, and a Manual Numbering Direction was not chosen, the objects are automatically numbered.
Only the specified object type is numbered. If a limit has been set, the Spotlight Numbering dialog box reopens automatically when the limit is reached; modify the needed values and continue numbering.
After the numbering operation, the numbered objects are selected, to help you identify which items have been numbered. The Object Info palette updates to reflect the new numbering of each object.
Copying the unit number to all accessories
|
Command |
Path |
|
Copy Unit Number to Accessories |
Context menu |
This command copies the Unit Number value from the selected lighting devices to their attached accessories. For multi-cell lighting devices, the unit number of each cell is copied to all accessories associated with that cell.
To apply the lighting device unit number to the accessories:
Select one or more lighting devices.
Select the command.
